The seating placement is important in any home theater. You want to make sure everybody gets the same movie-watching experience, with an unobstructed view of the screen and excellent sound quality.
Rearranging the seats in an existing home theater is a simple way to improve the room’s design without any extra expense. If you’re just starting out with your home theater, planning the seating layout first can save you a lot of hassle down the line.
While each space has its own unique concerns and ideal layout, there are a few general tips that will help you make the most of any home theater. We’ve laid them out for you below in 5 easy steps.
Step 1: Measure and assess your space
Most home theaters are built into rooms with fixed dimensions. Measuring out the room wall to wall gives you a general idea of how much space you have to work with. Don’t forget about other permanent fixtures and furnishings, however. Support columns, ceiling fans, and built-in furnishings can impact both the acoustics and the sightlines in your home theater.
Step 2: Choose your seating count and style
If you’re starting from scratch, figure this out before you even buy your A/V equipment. This is especially important if you’re designing a projector-based home theater so you’ll know what kind of throw ratio or keystone adjustment you need to look for.
Different styles of seating will have different dimensions. 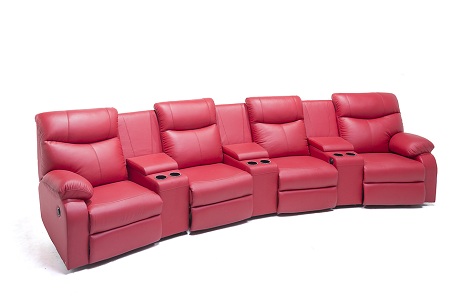
Source:shutterstock
Padded armchair-style seats with arm-rests in between are wider than stadium-style seating, so you’ll need to plan your layout accordingly. Seats that fully recline or have extendable footrests will need additional room front to back.
Keep in mind you don’t have to use the same seating style in your entire home theater. If you want the option of hosting large viewing parties but will mostly be using the theater with your family. You could put in a few “VIP” seats that fully recline and use smaller seats around them for additional guests. This will maximize both your space and your budget without sacrificing your comfort for daily use.
Don’t be afraid to get creative with your seating. You can use bean bag-style chairs to create natural tiers in the theater without any construction. They even come in sofa and armchair versions that are a bit more sophisticated, and the classic bean bags are ideal if you’ll be hosting kids parties.
Step 3: Sketch the layout
Source:artwallpapers.co
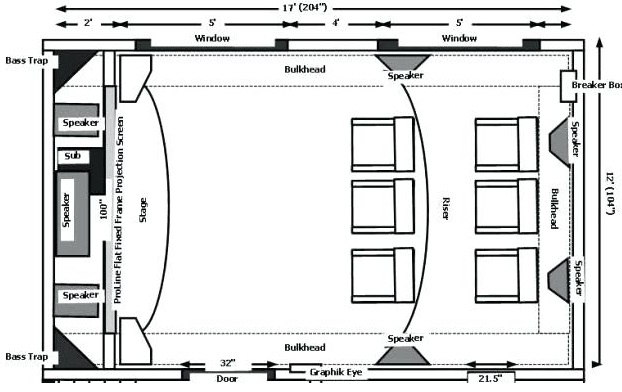
A visual representation of how the room will look can help you verify your measurements and calculations before you start buying and installing fixtures. You don’t need to be an artist or an architect to do this—just some graph paper and a ruler.
Start by drawing in the walls of the room on your graph paper and noting the scale. Draw in permanent fixtures with pen or marker. Also note any light sources, including windows. This is especially important for projector-based home theaters, but will also affect the viewability of TV screens and should be a factor in your layout decisions.
Use a pencil to sketch in the potential location of the seats, screen, and speakers. Depending on the dimensions of the room and how many seats you want, you may need to plan for multiple rows. You can use dotted lines to denote the maximum size of reclining seats or extendable footrests.
When you draw out the room, you’ll be able to see if you’re leaving enough space around the seats to navigate comfortably. You may want to sketch out a few different potential layouts and compare them side by side. A good rule of thumb is to leave a path of at least 30” between seats and walls and to give your guests at least 20” between the seats, even when they’re fully reclined.
If you’d rather not draw the layout from scratch, you could instead search for home theater layouts online and adjust them to fit your specific space. This might be a helpful approach if you’re not sure how you want your theater to be laid out and want to get professional guidance without hiring one for a consultation.
Step 4: Check the view from all seats
Source:acousticfrontiers.com
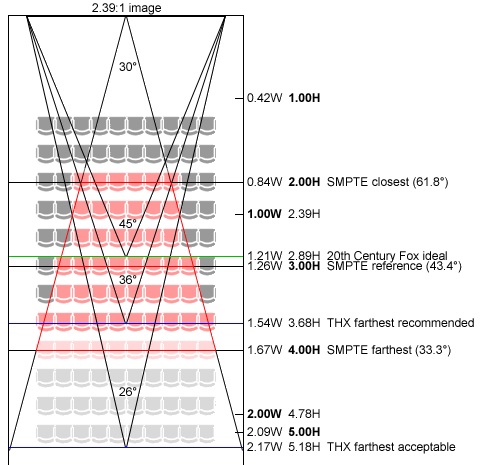
The ideal viewing angle is between 36° and 50°. This allows the image to fill the viewer’s field of vision, making the experience truly immersive. If it’s not possible to get every seat in the theater within this range, identify the seats that will be used most frequently and perfect the view there.
At the very least, you want every seat to be able to see the screen. There are two ways to do this in a layout with multiple rows. The first is to put back row(s) on risers so they can see over the row(s) in front. The second is to hang the screen higher and use reclining seats to avoid neck strain.
This is also when you should think about the size of your screen. There’s a Goldilocks Zone for the screen size in a home theater—one that’s not too big and not too small, but just right. The closest seats should be at least twice as far away as the screen is wide. The furthest seats so be no more than five times the image width from the screen.
Say your image is 50” wide. Your first row should be no closer than 100” (or 8 feet, 4 inches) to the screen. Your last row should be no further than 250” (or 20 feet, 10 inches) from the screen. Make sure you’re using the width, not the screen’s diagonal, which is the measurement most commonly used to measure screen size. You can use this calculator to figure out the width from the diagonal.
Step 5: Check the sound from all seats
The rear surround sound speakers should be behind all the seats in your theater. This is the main reason you don’t want to put the back row flush against a wall. Distribute the other speakers evenly down the wall. A 5-speaker set-up should be plenty for a single row of seats, but for multiple rows, you’ll likely want 7 or even 9 speakers to ensure even sound production.
Most people put more thought into the placement of their surround sound speakers than their subwoofer. This is one of the biggest mistakes made in home theater set-ups. The bass response changes throughout a room, and it impacts the viewer more powerfully than the treble and mid-range frequencies produced by speakers.
Multiple subwoofers will usually be needed to get the right level of bass in a multi-row home theater. You should have at least 2 subwoofers in a 2-row set-up and should add a subwoofer for every additional row. (For more details how to get sound from the projector to speakers click here)
Getting this much sound equipment can be expensive, especially if you’re looking for quality along with quantity. Perfect the sound for the seats that will get the most use first. You can always add additional equipment down the line.
REFERENCES AND FURTHER READING:
- Riser Height Calculator
- Home Theater Seating Layout Placement tips by Acoustic Frontiers
- Home theater projector buying guide