Just like TVs, most modern projectors give you a lot of different ways to watch content. Multiple connection options are great if you want a projector that’s more versatile, but it can also make it trickier to figure out how to set up your system. No matter what other options they offer, pretty much every home theater projector will at least have one HDMI port. Learning how to connect a laptop to a projector with HDMI isn’t much different than doing it on your TV. In either case, it’s very easy. We’ll walk you through the steps below and you’ll be watching your favorite shows in no time.
Understanding the HDMI Port: The Core of the Process
The foundation of connecting a laptop to a projector lies in the HDMI port. Almost all modern projectors and laptops have at least one HDMI port, simplifying the setup process. Whether you’re setting up a home theater system or just wanting to project your laptop screen for a presentation, the HDMI port is key. Essentially, this port is a pathway for both audio and video signals, allowing for the seamless transmission of high-quality content from your laptop to your projector.
HDMI: A Synonym for Convenience
One of the major reasons why HDMI is a go-to choice for many is its convenience. Being the most common connection on a wide range of electronic equipment, including projectors, laptops, and gaming consoles, HDMI has become a standard. Due to its widespread use, there is a vast variety of HDMI cables available on the market. Regardless of the length or style of the cable you need, you can find one easily and affordably. (>>> Find great HDMI cable options on Amazon).
Advantages of HDMI: Simplicity and Quality
When HDMI first emerged, it was applauded for its ability to reduce cable clutter. No more need for separate cables for audio and video – HDMI combines these two into a single cable, significantly simplifying your setup. This feature is especially beneficial when you want to connect your laptop screen to a projector. But the advantages of HDMI don’t stop at simplicity; it’s also a champion of quality. It transfers uncompressed signals, ensuring no quality loss. If you’re after the best resolution, a Category 2 HDMI cable should be your choice, as it excels at transmitting 1080p content.
It’s very easy to connect devices using HDMI. When it comes to learning how to connect a laptop to a projector, you can get yourself set up in just four easy steps:
Step 1: HDMI Cable Selection: Ensuring the Right Connections and Length
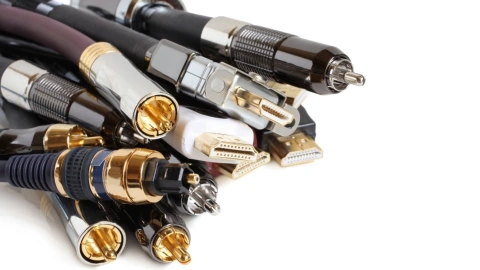
The first step in connecting a laptop to a projector via HDMI involves selecting the appropriate cable. Most laptops, including sleek models like Chromebooks, have an HDMI port, so compatibility isn’t usually a concern. However, do consider the placement of the HDMI port on your laptop and ensure the cable won’t interfere with other connections. The length of the HDMI cable is another crucial factor to consider. Measure the distance between the projector’s HDMI port and your laptop’s location to choose a cable with a suitable length, allowing some extra length for flexibility. (>>> Find great HDMI cable options on Amazon).
Step 2: Power Up Your Laptop: Ensuring Optimum Performance
Playing a movie or a presentation on your laptop can be power-intensive, and some laptops feature built-in power management systems that restrict HDMI output when running on battery. Hence, it’s advisable to plug in your laptop for an uninterrupted viewing experience. A powered-up laptop generally offers better overall performance, minimizing interruptions or delays and ensuring better picture quality.
Step 3: Adjusting Power Settings: A Solution for Unplugged Use
If plugging in your laptop isn’t an option while it’s connected to the projector, you can adjust the power settings via the control panel. This alteration will allow your laptop to send HD content via HDMI without restrictions, but keep in mind that this can deplete your battery quickly.
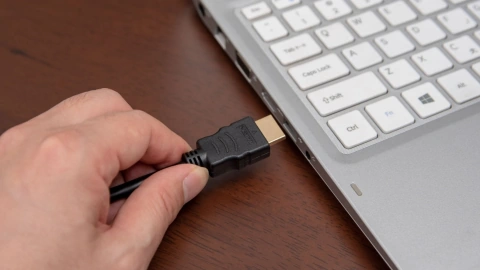
Step 4: Connecting the HDMI Cable: Uniting Your Laptop and Projector
Connecting your laptop to the projector involves plugging the HDMI cable into the HDMI ports on both devices. If your devices have multiple ports, choose an HDMI-only port rather than a shared one. This step ensures that both video and audio from your laptop screen are smoothly transmitted to the projector.
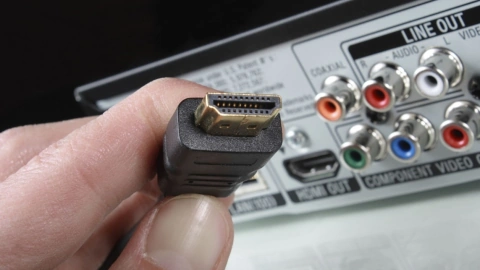
Step 5: Power On and Enjoy: Activating the Connection
After connecting the devices with an HDMI cable, power on both the projector and the laptop. If your projector features multiple HDMI ports, make sure the selected input channel corresponds to the one connected to your laptop. At this point, your laptop should be successfully connected to your projector, allowing you to enjoy your desired content on a larger screen.
The Challenge: Troubleshooting Connectivity Issues
Despite the ease of setting up an HDMI connection between your laptop and a projector, occasionally, you might encounter issues. If the picture doesn’t appear on your projector immediately, don’t panic. In most cases, a simple fix can rectify the problem and get your projection running.
If the picture doesn’t come up on your projector right away, there’s probably an easy fix that will get you up and running. Check the tips below if you’re having problems.
Tip #1: Rechecking the Connections. Start by double-checking the connections. Ensure that the HDMI cable is securely plugged into both the laptop and the projector. During the setup process, the cable could get dislodged without you noticing. If the connections seem firm, head to your laptop’s settings and confirm that it is enabled to send content through the HDMI port.
Tip #2: Restarting the Devices. If verifying the connections doesn’t solve the problem, try restarting both devices. While most devices recognize a new connection automatically, sometimes a glitch could prevent this automatic recognition. Keep the HDMI cable connected and turn off both your projector and laptop. When rebooting, power on the projector first, followed by your laptop. This sequence can often resolve any recognition issues.
Tip #3: Inspecting the HDMI Cable. HDMI technology is designed to be backwards-compatible, meaning you can use a Category 2 cable with a Category 1 connection without any issues. However, using an old HDMI cable with newer equipment might lead to problems. If the picture appears pixelated or blocky, you might need to upgrade your cable. An outdated cable could also cause intermittent connection problems or audio loss.
The Wireless Option: An Alternative to HDMI Cables
While HDMI cables are the standard method for connecting a laptop to a projector, they might not always be practical, especially if your projector is ceiling-mounted. Projectors with wireless capabilities can be costly, but there’s a workaround: a Wi-Fi dongle (Find great options on Amazon). This device can convert any projector with an HDMI port into a wireless projector, and it’s compatible with phones, tablets, and laptops.
HDMI vs. VGA Ports: The Modern vs. The Traditional
HDMI ports are not the only option for connecting a laptop to a projector. VGA ports, though increasingly less common, can also be used. While VGA can handle high-definition images, it doesn’t support audio like HDMI. Hence, if you decide to use VGA ports instead of HDMI, you’ll need a separate cable for audio transmission.
HDMI Adapter: A Solution for Laptops without HDMI Ports
What if your laptop doesn’t have an HDMI port? Enter the HDMI adapter. This device allows you to convert another type of connection, such as VGA or DVI, into an HDMI connection. It’s crucial, however, to ensure that the adapter is compatible with your laptop and projector before purchasing.
Importance of Laptop Screen Resolution Settings
The resolution of your laptop screen can significantly impact the quality of the projection. For optimal quality, ensure your laptop’s resolution matches that of your projector. You can adjust the screen resolution in the display settings of your laptop.
Mirroring vs. Extending Your Laptop Screen
When connecting your laptop to a projector, you have the option to either mirror your laptop screen or extend it. Mirroring will display the same content on both screens, ideal for presentations. Extending, on the other hand, treats the projector as a second monitor, useful when you need extra screen space.
Audio Settings: Ensuring Sound is Transmitted
One benefit of an HDMI connection is its ability to carry both video and audio signals. However, to ensure audio is transmitted from your laptop to your projector, you may need to adjust the audio output settings on your laptop. Make sure the sound output is set to HDMI.
Laptop to Projector Setup: Ideal for Business and Education
Connecting a laptop to a projector using an HDMI cable is not only useful for home theater setups but also beneficial in business and educational settings. Whether you’re presenting a business proposal, conducting a lecture, or sharing educational content, the process remains the same. The ease of setup and the high-quality output make this a versatile solution for displaying content on a larger scale.
Maintaining Your HDMI Port and Cable
To ensure a long-lasting and trouble-free connection between your laptop and projector, it’s important to maintain your HDMI ports and cables. Avoid excessive bending or twisting of the HDMI cable, which can damage the internal wiring. Similarly, when plugging in or removing the cable, do so gently to prevent damage to the HDMI ports on your devices.
Final Thoughts: Simplicity and Versatility with HDMI
In conclusion, connecting a laptop to a projector using an HDMI cable is a straightforward process that requires minimal equipment. Despite the occasional hiccups, most issues can be easily resolved with some basic troubleshooting. Whether you’re setting up a home theater or preparing for a presentation, HDMI offers a simple, high-quality, and versatile solution. Enjoy your favorite movies, games, or slideshows on the big screen with ease and convenience.